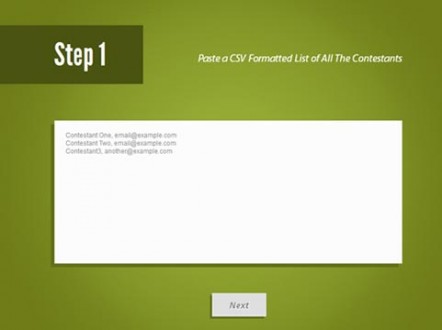
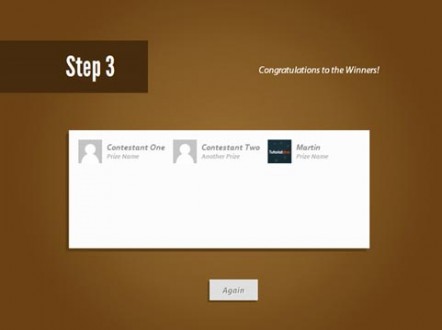
The first Tutorialzine giveaway has finished! Now is the time to draw the winners. But, as this is a web development blog, we cannot just run an ORDER BY RAND() MySQL query in phpMyAdmin. Even more, three different sets of prizes must be awarded. This calls for a bit more stylish approach – a dedicated randomizer jQuery app, especially made for choosing winners in competitions and giveaways.
The app is divided in three steps – in step one you provide a list of the contestants’ name and email, divided by a comma (each contestant on a separate line). In the second step, you provide a prize name and a number, signifying the number of copies that have been offered. In the last step, you get a randomly selected list of contestants and their prizes.
The HTML
As usual, we start with the HTML markup and the new doctype. After this, we continue with the stylesheets. The first stylesheet is generated by the awesome fontface generator at fontsquirrel. It will allow us to use the non web-safe LeagueGothic font in every browser. The font files themselves reside in the LeagueGothic folder in the demo.
randomizer.html
04 |
<meta http-equiv="Content-Type" content="text/html; charset=utf-8" /> |
05 |
<title>Making a Giveaway Randomizer App w/ jQuery | Tutorialzine Demo</title> |
07 |
<link rel="stylesheet" type="text/css" href="LeagueGothic/fontface.css" /> |
08 |
<link rel="stylesheet" type="text/css" href="styles.css" /> |
14 |
<div class="step" id="step1"> |
17 |
<h2>Paste a CSV Formatted List of All The Contestants</h2> |
20 |
<a href="#" class="button">Next</a> |
24 |
<div class="step" id="step2"> |
27 |
<h2>Paste a CSV Formatted List of All The Prizes</h2> |
29 |
<a href="#" class="button back">Back</a> |
30 |
<a href="#" class="button finish">Finish!</a> |
34 |
<div class="step" id="step3"> |
37 |
<h2>Congratulations to the Winners!</h2> |
38 |
<div class="results"></div> |
39 |
<a href="#" class="button again">Again</a> |
44 |
<script src="md5.js"></script> |
45 |
<script src="script.js"></script> |
As you will see in a moment, we are applying a number of styles to the body element and use it as a regular block container. Inside it we have the three .step divs, which contain their own set of headings, textareas and buttons.
As you will see in the next section of the tutorial, we are making the body three times wider than the browser window, and each section div is exactly 33.333% of its width. This makes the sections as wide as the browser (this remains so even if you resize the window).
Lastly we include the jQuery library, our script.js file, and another one – md5.js. JavaScript does not provide means of calculating md5 hashes, so we are including a pure JavaScript implementation of the md5() PHP function, created by the php.js project. We are going to need this in the final step, where we are pulling the commenter’s avatars from Gravatar, using their email addresses.

The CSS
The next step in building the app, is laying down the CSS. Only the more interesting styles are presented here. You can see the rest in styles.css in the download archive.
styles.css – Part 1
04 |
* The background of the HTML element is |
05 |
* visible as the top and bottom dark strips. |
08 |
background-color:#424242; |
14 |
font-family:Arial, Helvetica, sans-serif; |
17 |
* Using the body element as a |
18 |
* container for the animation |
29 |
/* Each step takes one third of the width */ |
40 |
#step1{ background:url('img/bg_1.jpg') no-repeat center center #6f7c18;} |
43 |
-moz-box-shadow:-7px 7px 0 #637018; |
44 |
-webkit-box-shadow:-7px 7px 0 #637018; |
45 |
box-shadow:-7px 7px 0 #637018; |
49 |
-moz-box-shadow:-4px 4px 0 #637018; |
50 |
-webkit-box-shadow:-4px 4px 0 #637018; |
51 |
box-shadow:-4px 4px 0 #637018; |
54 |
#step1 a.button:active{ |
56 |
/* The pressed state of the button */ |
58 |
-moz-box-shadow:-2px 2px 0 #637018; |
59 |
-webkit-box-shadow:-2px 2px 0 #637018; |
60 |
box-shadow:-2px 2px 0 #637018; |
63 |
#step1 h1{ background-color:#4a5310;} |
What is happening here, is that we are using the body element as a regular container and apply a fixed positioning on it. This keeps the markup of the page to a minimum and demonstrates that the body is no different from the other elements on the page. We are making the body three times the width of the browser window. As all the sizes are given in percentages, everything is going to scale even if you resize the browser.
Notice that we’ve applied a background color to the html element. This is visible as two darker strips in the top and bottom of the app.
The three steps are floated to the left and are 33.333% of the width of the body element, which makes them perfectly fill the width of the screen. Each step has an individual set of rules applied (thanks to the IDs of the step classes), such as a background image, different colors for the box shadows and the h1 heading. Only the classes of the first step are given here, step2 and step3 follow the same idea.
styles.css – Part 2
01 |
/* Each step contains a section, centered in the page */ |
06 |
margin:-275px 0 0 -328px; |
15 |
font-family:'LeagueGothicRegular',Arial,Helvetica,sans-serif; |
22 |
padding:20px 70px 20px 20px; |
27 |
/* The instruction text */ |
36 |
font-family:'Myriad Pro', Corbel, Arial, Helvetica, sans-serif; |
41 |
background-color:#fcfcfc; |
45 |
font-family:Arial,Helvetica,sans-serif; |
Inside each step div is an element with a .section class. It is centered horizontally and vertically on the page with CSS. All the headings, textboxes and buttons are positioned in relation with the section and are also perfectly centered.
The most interesting part is probably the h1 heading, which is always shown in the left part of the screen (no matter how large the window is) and stops precisely at 488px from the right border of the section. It also uses LeagueGothicRegular, the fontface embedded font, the definition of which you can find defined in LeagueGothic/fontface.css
The jQuery
Now it is time to actually make this little app work. Fire your engines, it’s jQuery time!
script.js – Part 1
01 |
$(document).ready(function(){ |
03 |
/* An object with element selectors and margin values */ |
06 |
'#step1 a.button' : '-100%', |
07 |
'#step2 a.finish' : '-200%', |
14 |
// Adding a click event listener to |
15 |
// every element in the object: |
17 |
$.each(buttonMargins,function(key,val){ |
18 |
$(key).click(function(){ |
19 |
b.animate({marginLeft:val}); |
24 |
// An additional click handler for the finish button: |
26 |
$('#step2 a.finish').click(function(){ |
28 |
var resultsDiv = $('#step3 .results'); |
30 |
// Catching the errors with a try / catch statement: |
36 |
var contestants = parseCSV($('#step1 textarea').val(),'contestants'), |
37 |
prizes = parseCSV($('#step2 textarea').val(),'prizes'), |
40 |
// The second element of the prizes CSV is |
41 |
// the number of copies of the prize |
43 |
$.each(prizes, function(){ |
44 |
for(var i=0;i<this.col2;i++){ |
46 |
// The allPrizes array contains |
47 |
// one entry for each prize. |
49 |
allPrizes.push(this.col1); |
53 |
if(allPrizes.length > contestants.length){ |
54 |
throw 'There are more prizes than contestants!'; |
57 |
// Randomizing both the contestants and the prizes: |
59 |
contestants = contestants.shuffle(); |
60 |
allPrizes = allPrizes.shuffle(); |
66 |
// Generating the markup: |
67 |
for(var i=0;i<allPrizes.length;i++){ |
68 |
var result = $('<div>',{className:'result'}); |
70 |
// Using a pure JavaScript md5 implementation to generate the hash |
71 |
// of the email so we can fetch the avatar from Gravatar: |
73 |
result.append($('<img>',{ |
74 |
src: gravatarURL.replace('-REPLACE-',md5(contestants[i].col2.toLowerCase())) |
77 |
result.append($('<p>',{ |
79 |
title : contestants[i].col1 + ', ' +contestants[i].col2, |
80 |
html : contestants[i].col1 + '<i>'+allPrizes[i]+'</i>' |
83 |
resultsDiv.append(result); |
88 |
// Dispaly the error message: |
89 |
resultsDiv.append($('<p>',{className:'error',html:e})); |
The script is enclosed in the document.ready event listening function. The first thing the script does is to attach a set of events to the buttons. These create an animated movement of the body via a negative margin value, and show the different steps. To keep us from having to write the event listeners individually, the script loops through the buttonMargins object and attaches the listeners for us.
The finish button gets special treatment, as when it is clicked, the CSV formatted data in the textareas has to be parsed and randomly combined to produce the winners. Notice how we use the md5 function we included earlier, to calculate the email hash on line 74, which is used to fetch the contestants’s avatar from Gravatar.

script.js – Part 2
01 |
function parseCSV(str, name){ |
03 |
// A simple function for parsing CSV formatted text |
05 |
var arr = str.split('n'); |
08 |
throw 'The '+name+' list cannot be empty!'; |
14 |
for(var i=0;i<arr.length;i++){ |
18 |
tmp = arr[i].split(','); |
21 |
throw 'The '+name+' list is malformed!'; |
25 |
col1 : $.trim(tmp[0]), |
33 |
// A method for returning a randomized array: |
34 |
Array.prototype.shuffle = function(deep){ |
35 |
var i = this.length, j, t; |
37 |
j = Math.floor((i--) * Math.random()); |
38 |
t = deep && typeof this[i].shuffle!=='undefined' ? this[i].shuffle() : this[i]; |
In the second part of script.js, you can see the simple parseCSV() function. It is designed to parse the contents of the two textareas and return an array of objects. Each object contains a col1 and col2 properties, which correspond to the data in the textareas. This is later used to produce the name / prize combinations.
Also, notice the shuffle method, which is defined on the Array prototype. Defining it this way makes it available to any array in the script. We use it to shuffle the contestants and the prizes, so that everyone has a fair chance of winning.
With this our simple randomizer app is ready!
Download Demo
Related Posts :
This time, we are making a Simple AJAX Commenting System. It will feature a gravatar integratio ...
QUnit is a powerful JavaScript unit testing framework that helps you to debug code. It’s writte ...
It can be time consuming to make web forms both pretty and accessible. In particular, laying ...
The other day I was trying to style CSS3 border-radius to image element and I realized that Fir ...


